
Garlic Bread (गार्लिक ब्रेड (आणि यीस्ट बद्दल बरंच काही)) (with tips about Yeast)
गार्लिक ब्रेड (आणि यीस्ट बद्दल बरंच काही) मराठी
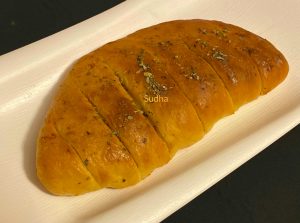
Almost everyone likes nice fluffy Garlic Bread. When you bake it at home, the aroma of Butter and Garlic is absolutely irresistible. Everyone just waits for the oven timer to stop. Garlic Bread recipe is very similar to the one of making Pav. It’s much faster also as the last step of proofing the dough balls is not required for making Garlic Bread. The amount of butter you use while making Garlic Bread is important. You need a generous portion of Butter for making soft Garlic Bread; else bread will be dry.
I’m repeating my tips related to Yeast here as it’s most relevant.
Basically there are only 5 ingredients required for Pav – All Purpose Flour, Salt, Oil, Yeast and Warm Water. Proportion differs from recipe to recipe. But the most important ingredient is Yeast. My experience with yeast is that the first time you use it after opening the new pack, results are awesome. Second time results are okay. Third time onwards, it’s your luck if the yeast works the way you want it to work. This is after storing the yeast pack in air tight container in refrigerator. So be watchful for yeast. Once the dough did not rise as expected, so instead of baking Pav, I made Parathas using that dough. Parathas were nice and soft. These are called Khamiri Paratha. Anyway, try this recipe when you are sure about the quality of yeast.
If you don’t have oven, you can bake Pav using a Wok / Pan.
Ingredients (Makes 2 portions of half circular Bread)
All Purpose Flour (Maida) 2 cups + 3 tablespoon
Sugar ½ tablespoon
Dry Yeast ½ teaspoon
Salt 1 teaspoon
Oil 1.5 tablespoon
Milk + butter for brushing
Butter at least 75 gms (¾ of 100 gm slab)
Crushed Garlic 3 tablespoon
Oregano 2 tablespoon
Chili Flakes as required (optional)
Grated Cheese as much as you want
Instructions
1. Warm 2 tablespoon of water. Add sugar and yeast. Mix and keep covered for 10 min.
2. Yeast should become frothy. If it does not, then it is not right quality yeast. Buy a new pack of yeast and repeat step 1.
3. Mix All Purpose Flour, salt on the kitchen platform.
4. Make a well and add yeast mixture. Keep adding warm water and knead a soft dough.
5. Add Oil and knead for 15 minutes using your palm. This is an important step in this recipe.
6. Transfer the dough to a container. Apply little butter on top and Keep the dough covered for 1 hour.
7. The dough should rise 2 to 3 times. If it does not keep it covered for 30 minutes. Still if it does not rise, you should not proceed with baking Pav. Make Parathas using this dough.
8. Using 1 tablespoon All Purpose Flour, punch the dough. Knead for 2-3 minutes.
9. Divide the dough in 2 parts. Roll/ Pat each part into a circle about 8 inch diameter. Use All purpose flour for dusting as required.
10. Apply butter and crushed Garlic on the dough circle; sprinkle Oregano, chili flakes and Grated Cheese as required.
11. Fold each circle once to form a semi circular shape. Using a knife / pizza cutter gently make marks to make 7-8 pieces. Apply some more butter on the top and sprinkle Oregano.
12. Apply some milk on the top.
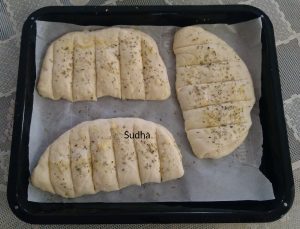
13. Bake in a preheated oven on 200 degrees for 20-25 minutes. Bread should be light brown on top. Or roast it in a pan for 45-50 minutes.
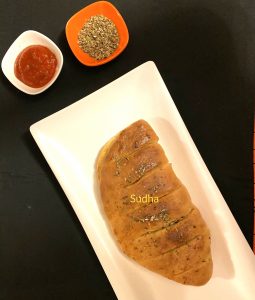
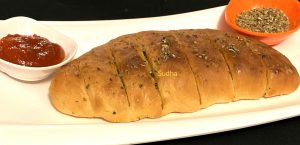
14. Brush with butter. Allow to cool. Enjoy yummy Garlic Bread with choice of dip.
गार्लिक ब्रेड (आणि यीस्ट बद्दल बरंच काही)
गार्लिक ब्रेड बहुतेक सगळ्यांना आवडतो. आणि तो जर घरी बनवलेला असेल तर सोने पे सुहागा. ओव्हनमध्ये गार्लिक ब्रेड भाजताना बटर आणि लसणीचा दरवळ घरभर पसरतो आणि सगळे जण ओव्हन चा टायमर बंद व्हायची वाट बघत बसतात.
गार्लिक ब्रेड ची कृती पावासारखीच असते. आणि दुसऱ्या वेळेला पीठ फुलायला लागत नसल्यामुळे पावापेक्षा लवकर होणारी कृती आहे. गार्लिक ब्रेड मध्ये बटर अगदी सढळ हाताने घालावं लागतं. नाहीतर ब्रेड सुका होतो.
पावासारखी कृती असल्यामुळे मी यीस्ट संबंधीच्या माझ्या टिप्स पुन्हा देतेय. म्हणजे ह्या रेसिपीत सगळ्या टिप्स एकत्र वाचता येतील.
पाव बनवायला ५च जिन्नस लागतात. मैदा, मीठ, तेल, यीस्ट आणि पाणी. आणि यातला सगळ्यात महत्त्वाचा (आणि दगा देणारा) जिन्नस म्हणजे यीस्ट. माझ्या अनुभवानुसार यीस्ट चं नवीन पाकीट उघडून ते यीस्ट वापरलं तर पाव छान बनण्याचे चान्सेस जास्त असतात. तुम्ही दुसऱ्या वेळेला त्या पाकिटातलं यीस्ट वापरलं तर पाव छान होण्याचे चान्सेस फक्त ५० टक्के. आणि तिसऱ्या वेळेला त्या पाकिटातलं यीस्ट वापरलं आणि पाव छान झाला तर तुम्ही नक्कीच खूप नशीबवान असता (त्यादिवशी अचानक धनलाभ वगैरे योग असू शकतात तुमच्या भविष्यात !!!). मी तर एकदा नवीन पाकीट उघडून वापरलेलं यीस्ट सुद्धा फेकून दिलेलं आहे . मग कुठल्या ब्रँड चं यीस्ट वापरावं? माझी एक मैत्रीण Sooper ब्रँड च यीस्ट वापरते. हे १०० टक्के चांगले असतं असं ती सांगते. पण ते सगळीकडे मिळत नाही. मग तुमच्या आजूबाजूला जो ब्रँड चांगला मिळत असेल तो वापरा. एखादा बेकरी वाला ओळखीचा असेल तर त्याच्याकडून घेऊन या. मी माझ्या मित्राकडूनच यीस्ट आणते.पावाच्या कृतीमध्ये महत्त्वाच्या २ स्टेप्स मध्ये तुम्हाला कळेल की पाव छान होणार की फसणार ते.१. पहिली स्टेप ज्यात तुम्ही यीस्ट साखर घालून कोमट पाण्यात भिजवता ती (activation). यीस्ट जर छान फुलून आलं तर पुढची कृती करा. नाहीतर ते मिश्रण सरळ टाकून द्या आणि नवीन यीस्ट आणून पुन्हा प्रयत्न करा.२. जेव्हा तुम्ही पावाचं पीठ मळून फुगण्यासाठी ठेवता. पीठ जर एक / दीड तासात २-३ पट फुगलं नाही तर पाव बनवण्याच्या फंदात पडू नका. पाव चांगले होणार नाहीत. त्या पिठाचे पराठे बनवा (ह्याला खमिरी पराठे म्हणतात). छान होतात.ह्या २ स्टेप्स व्यवस्थित पार पडल्या की पाव छान होणार..
ओव्हन नसेल तर तुम्ही कढई / पातेल्यात मीठ / वाळू घालून त्यावर जाळी ठेवून त्यावर ब्रेड ठेवून झाकण ठेवून पाव भाजू शकता. भाजायला ४०–४५ मिनिटं लागतील.
साहित्य (२ अर्धगोलाकार ब्रेड बनतात )
मैदा २ कप
साखर अर्धा टेबलस्पून
ड्राय यीस्ट अर्धा चमचा
मीठ १ चमचा
तेल दीड टेबलस्पून
दूध + बटर ( पाव भाजताना वरून लावायला)
बटर कमीत कमी ७५ ग्रॅम्स (१०० ग्राम पाकिटाचा पाऊण भाग)
ठेचलेली लसूण ३ टेबलस्पून
ओरिगानो २ टेबलस्पून
चिली फ्लेक्स आवडीनुसार (ऐच्छिक)
किसलेले चीज हवं तेवढं
कृती
१. एका कपात २ टेबलस्पून कोमट पाणी घ्या . त्यात साखर आणि यीस्ट घालून ढवळा आणि १० मिनिटं झाकून ठेवा.
२. यीस्ट छान फुलून आलं पाहिजे (). यीस्ट फुललं नाही तर मिश्रण फेकून द्या. नवीन यीस्ट आणा आणि स्टेप १ पासून परत कृती करा.
३. किचन चा ओटास्वच्छ पुसून घ्या. मैदा आणि मीठ ओट्यावर मिक्स करा.
४. पिठ गोलाकार पसरून मध्ये खड्डा करा. त्यात यीस्ट च मिश्रण घालून मिक्स करा. आता थोडं थोडं कोमट पाणी घालून सैलसर पीठ भिजवा.
५. तेल घाला आणि पीठ १५ मिनिटं तळहाताने नीट मळून घ्या. पीठ छान मळणे हे खूप महत्त्वाचं आहे.
६. पीठ एका मोठ्या बाउल मध्ये ठेवा. वरून थोडं तेल लावा आणि १ तासभर बाउल झाकून ठेवा. बाउल मोठी घ्या कारण पीठ २-३ पट फुलतं.
७. पीठ २–३ पट फुगलं पाहिजे. नाही फुगलं तर आणखी अर्धा तास बाउल झाकून ठेवा. तरीपण पीठ फुललं नाही तर पाव बनवायच्या फंदात पडू नका. पाव चांगले होणार नाहीत. त्या पिठाचे पराठे बनवा. पराठे छान होतात.
८. १ टेबलस्पून मैदा पिठात घालून पिठाला हाताने बुक्के मारा. पिठातली हवा काढायची आहे. २–३ मिनिटं पीठ मळून घ्या.
९. पिठाच्या गोळ्याचे २ भाग करा. प्रत्येक भाग हाताने थापून / लाटून ८ इंच व्यासाची पोळी बनवा.
१०. पोळीवर बटर पसरून घ्या. ठेचलेली लसूण, चीज पसरवा. ओरिगानो, चिली फ्लेक्स भुरभुरवा. पोळी दुमडून अर्धगोल बनवा.
११. वरून बटर लावा आणि दुधाचा ब्रश फिरवा. ओरिगानो भुरभुरवा.
१२. प्री हीटेड ओव्हन मध्ये २०० डिग्री वर २०–२५ मिनिटं बेक करा. ब्रेड वरून गुलाबी झाले पाहिजेत.
१३. ब्रेड वर बटर चा ब्रश फिरवा. खाण्याएवढे थंड झाले की चविष्ट गार्लिक ब्रेड चा आस्वाद घ्या.
Chan ahe garlic bread chi receipe he pn karun bghate
Thank you
Can u share pic of yeast brand or packet?
Try Blue Bird or Sooper brand.\nSudha
Hi