
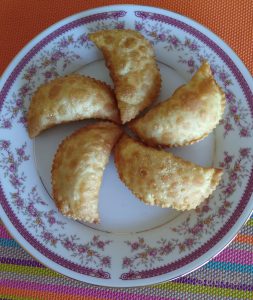
Khobaryachi Karanji (सुक्या खोबऱ्याच्या करंज्या) – Gujiya with Dry Coconut filling
सुक्या खोबऱ्याच्या करंज्या मराठी
This is a delicious Maharashtrian Recipe for dry coconut Gujiya. Filling of this is very easy to make and requires only 4 ingredients – Dry coconut, Powdered Sugar, Poppy Seeds and Cardamom Powder. Since this does not have Mava (Milk Solids), it lasts for 8-10 days.
Tips for making perfect Karanji
1. Use fine semolina for the cover.
2. For cover, add Ghee (don’t melt Ghee) to All purpose flour, Semolina mixture and bind a stiff dough by adding milk. If you add 1 tablespoon of corn flour to this dough, cover will be more crispy. Let it rest for 4-5 hours. Knead the dough properly before using it. If dough is not stiff, you will have to use dry flour for dusting while rolling dough balls. While deep frying, this dry dough will drop in the oil and oil will be brownish.
3. While grating dry coconut for the filling, grate the dark skin first and keep it separate. Later grate the white part and use it for filling. You can use grated dark skin for making gravy.
4. While making Karanji, roll the dough thin. If it’s thick, Karanji will not be well fried and will not be crisp.
5. Add enough filling in the Karanji. Seal the edges properly. If there is any gap, then filling will drop in the oil.
6. Deep fry Karanji on low heat. Once you slide in Karanji in oil, splash oil on the top part of Karanji. This way, Karanji will have a nice texture.
7. In case a Karanji breaks in oil, using a muslin cloth separate out the burnt filling from oil and then use the oil for frying.
8. Use Refined Oil / Ghee / Vanaspati to fry Karanji. Karanji fried in Filtered Oil smell of Oil after frying. Colour of Karanji will depend on the oil / Ghee used for frying.
Ingredients (makes 30 – 40 Karanji) (1 cup = 250 ml)
Maida (All purpose flour) ¾ cup
Rava Barik (Semolina Fine ) ¾ cup
Grated Dry Coconut 2 cup
Milk 1 cup (Approx)
Pure Ghee (Clarified Butter) 1.5 tablespoon
Powdered sugar 1.5 cup
Cardamom (Eliachy) Powder ½ teaspoon
Khaskhas (Poppy Seeds) 1 tablespoon
Salt ¼ teaspoon (optional)
Vanaspati Ghee (Thick Vegetable Oil) / Pure Ghee / Refined Oil To Fry
Instructions
Prepare Dough
1. Mix 1.5 tablespoon of pure ghee, a pinch of salt, semolina fine (rava barik) and Maida.
2. Add little milk at a time and Bind a stiff consistency dough.
3. Let it rest for 4-5 hours.
Prepare Filling
1. Grate dry coconut. To get nice white coconut, grate the brown skin of coconut first. Keep it aside. This can be used for subji or any gravy. Now grate the white dry coconut.
2. Dry roast khaskhas till light brown. Keep it aside to cool
3. Dry roast grated coconut till light brown. Keep it aside to cool
4. Grind khaskhas into a coarse powder. Use pulse mode of grinder for a few seconds; else the powder will be oily.
5. Crush roasted coconut by hand
6. Mix khaskhus powder, powdered sugar and Cardamom powder with crushed coconut
7. Filling is ready
Preparing Karanji
1. Make ½ inch round balls from the dough.
2. Roll each ball into a 3 inches round (puri).
3. Place 1 tablespoon of Filling in the center of the “puri”.
4. Fold the “puri” over to make it a semi-circle.
5. Seal the edges using drop of milk, pressing gently with fingers.
6. Trim the edges. “karanji” is ready for frying.
7. Keep the karanji covered with a thin wet (not dripping) cloth, to avoid it getting dry.
8. Repeat step 2 to 6 for all the dough.
Frying Karanji
1. Heat Vanaspati ghee in a wok on low flame.
2. Gently slip the above “karanji” into the heated oil.
3. While frying keep splashing some heated oil on the top side so that the top side is also fried.
4. Turn the “karanji” in the oil for frying all sides.
5. Fry till light brown on both sides.
6. Remove from oil and place it on tissue (this helps to soak the excess oil).
7. On cooling, store in air tight container. These will last for 8-10 days without refrigeration.
===================================================================================
सुक्या खोबऱ्याच्या खमंग खुसखुशीत करंज्या
दिवाळीसाठी हमखास केल्या जाणाऱ्या ह्या करंज्या करायला सोप्या आहेत. ह्यात मी मावा घालत नाही त्यामुळे ८–१० दिवस सहज टिकतात. सारणासाठी सुकं खोबरं, पिठीसाखर, खसखस आणि वेलची पूड. खोबरं आणि खसखस छान खमंग भाजून घेतली की मस्त स्वादिष्ट करंज्या होतात. सुका मेवा वगैरे काही घालायची जरूर नाही. काही जणी थोडी कणिक / रवा / बेसन भाजून सारणात घालतात. मी घालत नाही. हे न घालताही सारण आणि करंज्या सुरेख होतात.
पारीसाठी रवा, मैदा समसमान – माझ्या ओल्या नारळाच्या करंज्यांसारखं.
टिप्स
१. पारीसाठी बारीक रवा वापरा.
२. रवा आणि मैदा तुपाचं मोहन घालून दुधात घट्ट भिजवा (तूप गारच घाला) आणि ४–५ तास झाकून ठेवा. मुरल्यावर पीठ छान मळून घ्या. पारीच्या पिठात १ टेबलस्पून कॉर्न फ्लोअर घातलं तर पारी आणखी खुसखुशीत होते. पीठ सैल झालं तर लाटताना सुकं पीठ लावावं लागते आणि करंजी तळताना ते सुकं पीठ तेलात / तुपात उतरून तेल / तूप काळं होते.
३. सारणासाठी खोबरं किसताना आधी काळा भाग किसून वेगळा काढा. तो भाजीसाठी वापरू शकता. मग पांढरी खोबऱ्याची वाटी वेगळी किसून घ्या. सारणाचा रंग छान येतो.
४. करंजीची पुरी जाड लाटली तर करंजी नीट तळली जाणार नाही आणि खुसखुशीत होणार नाही. पुरी पातळ लाटा.
५. सारण भरताना पोळपाटावर लाटलेली पुरी ठेवून भरा किंवा पुरी तळव्यावर घेऊन भरा. पण सारण अगदी कमी भरले तर करंजी तळल्यावर खुळखुळा म्हणून वाजवता येईल. सारण भरल्यावर करंजी नीट बंद करा. कुठेही भोक राहिलं तर तळताना सारण बाहेर येतं आणि तेल/तूप खराब होतं.
६. करंजी तळताना तेलात/ तुपात सोडल्यावर मंद आचेवर तळा आणि झाऱ्याने करंजीच्या वरच्या भागावर हळू हळू तेल / तूप उडवा. असे केल्याने करंजीला छान मुखऱ्या येतात.
७. तळताना एखादी करंजी फुटली आणि सारण तेलात / तुपात पडलं तर तेल / तूप मलमल च्या कपड्याने गाळून घ्या आणि नंतर बाकीच्या करंज्या तळा. नाहीतर करंज्यांना तळलेल्या सारणाचे काळे डाग पडतात.
८. करंज्या तळायला रिफाईंड तेल किंवा तूप वापरा. फिल्टर्ड तेलात तळलेल्या करंज्यांना तेलाचा वास येतो. करंज्या कशात तळता यानुसार करंज्यांचा रंग बदलतो.
साहित्य (३०–४० करंज्यांसाठी ) (१ कप = २५० मिली )
मैदा पाऊण कप
बारीक रवा पाऊण कप
किसलेलं सुकं खोबरं २ कप
दूध १ कप (अंदाजे)
साजूक तूप दीड टेबलस्पून
पिठीसाखर दीड कप
वेलची पूड अर्धा चमचा
खसखस १ टेबलस्पून
मीठ पाव चमचा (ऐच्छिक)
तूप / रिफाईंड तेल तळण्यासाठी
कृती
१. पारीसाठी मैदा, रवा, साजूक तूप, चिमूटभर मीठ एकत्र करा. आणि दुधामध्ये घट्ट भिजवा. ४–५ तास झाकून ठेवा.
२. सारणासाठी किसलेलं सुकं खोबरं मंद आचेवर गुलाबी रंगावर भाजून घ्या.खसखस खमंग भाजून घ्या. खसखस गार झाल्यावर मिक्सर मध्ये पल्स मोड वर जाडसर वाटून घ्या. खोबरं हाताने चुरून घ्या. खोबरं, खसखस, पिठीसाखर आणि वेलची पूड नीट मिक्स करून घ्या. करंजीचं सारण तयार आहे.
३. आता करंज्या करण्यासाठी भिजवलेलं पीठ मळून घ्या. छोटया लाट्या बनवून पातळ पुऱ्या लाटून घ्या. प्रत्येक पुरीत चमचाभर सारण घालून पुरी फोल्ड करून हलके दाबून बंद करा. चिकटण्यासाठी कडेला दुधाचा थेम्ब लावा. कातण्याने कडा कापून घ्या.
४. तयार करंज्या ओल्या कपड्याने झाकून ठेवा. १५–२० करंज्या झाल्या की गरम तेल/ तुपात तळून घ्या.
५. तळताना करंजीच्या वरच्या बाजूला तेल/तूप झाऱ्याने हलकेच उडवा. करंजीला छान मुखऱ्या आल्या पाहिजेत. दोन्ही बाजू तळून टिशू पेपर वर काढून घ्या.
६. खमंग खुसखुशीत करंज्या तयार आहेत.
७. गार झाल्यावर हवाबंद डब्यात भरून ठेवा. ८–१० दिवस टिकतात.
आजच सामान आणते ..मी फराळ करत नाही..पण ही आवडली ..