
Microwave Cooking – Part I (मायक्रोवेव्ह कूकिंग भाग १)
मायक्रोवेव्ह कूकिंग भाग १ मराठी
Microwave Oven is a very useful equipment. Let’s see how we can use it for making our life easier.
Though all the Microwaves have same functions, each manufacturer uses different nomenclature and settings. Due to the difference in the nomenclature, it may seem that the operating instructions are different.
I have based this document using the operating steps of LG Intellowave Microwave that I’ve been using for last 17 years.
You will get an idea about how to operate a Microwave. Note that, you will have to use your Microwave as per setting of your model. It is better to read the Instruction Manual to understand the operations.
I’ll not be able to provide operating instructions of other models. If you have misplaced the manual, search on Google for your model. You will find the manual on internet.
When you are using the Microwave to cook a new dish, set the timer for a shorter duration and cook multiple times till the dish is properly cooked. This will help you to get an idea about the time required for the dish, after which you can set the timer appropriately.
Note that the time required to cook depends on Microwave capacity and the quantity being cooked.
I use the Microwave safe Plastic utensils that come along with Microwave as well as Microwave safe Glass utensils. If you don’t want to use Plastic, use only Glass utensils.
1. Heat water
During Covid19 Pandemic, most of us keep drinking warm / hot water. It is very easy to heat water in Microwave. You can use normal Tea cup. But make sure the cup does not have any golden print / edges. Add water in a cup and “quick start” the Microwave. Microwave will start on High power for 30 seconds / 1 minute (depending on the model). Microwave mode is shown as “3 waves” on the display. It takes about 30 seconds to heat a cup of water. If you want the water less hot, stop the microwave sooner. Microwave stops when you open the door of the Microwave. If you want the water hotter, start the Microwave again. If you press “quick start” button multiple times, the timer increases accordingly. (If the timer sets to 30 seconds after pressing “Quick Start”, by pressing “Quick Start” twice timer sets to 60 seconds). After doing this a couple of times, you will get an idea about the time it takes to heat the water to required temperature. Then you can set the timer accordingly.
2. Defrost food items
Many a times we forget to take out the food items from refrigerator upfront (Butter for Bread is one such thing mostly forgotten). In such a case you can use the Microwave in Defrost mode. Please note, the food item should be stored in Microwave safe container. Place the food container in Microwave and press “defrost” button. Timer will be automatically set to 2 – 2.15 minutes. Defrost mode is shown as 2 stars (**) on the display. Butter defrosts in 10-15 seconds. So stop the Microwave according. If you keep it for longer, butter melts. Time to defrost depends on the quantity of food item.
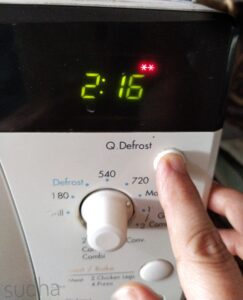
If your Microwave does not have a Defrost mode, start Microwave in “Microwave mode”. Keep checking after every 10 seconds. Butter defrosts in 5-10 seconds.
3. Cook Potatoes
You can cook Potatoes in Microwave using different methods.
a. Wash Potatoes and place them in Microwave safe container. Add water such that about half of Potatoes are dipped in water. Close Microwave door. Using “quick start” button set timer to 4 minutes. No need to press any other button. Microwave immediately starts. 5-6 medium size potatoes cook properly in 4 minutes. If Potatoes are bigger / smaller, it will take more / less time. It is advisable to choose Potatoes of similar size so that they are cooked evenly.
b. Wash Potatoes and place them in a plastic bag. Use a plain plastic bag without any print. Loosely fold the bag and place it in the Microwave. Follow the steps as given in (a) above. Once Potatoes are cooked, carefully take out the bag. Beware of the hot steam in the bag.
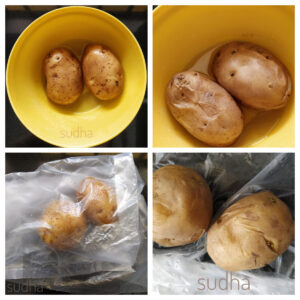
As per my experience, Potatoes cook better in plastic bag than in Microwave container. However, Potatoes cooked in Pressure Cooker are the best.
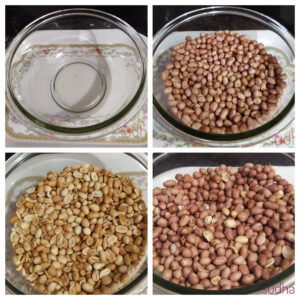
4. Roast Groundnuts
Microwave makes this boring task very easy. Use a Microwave safe Glass bowl for this. Transfer Groundnuts into this bowl. Place the bowl in the Microwave and close the door. We need to set Microwave Power to High and set the timer to 5 minutes. For this, Set the Microwave Mode button to 900 (Maximum Power). Press Start button. Now turn the Timer and set it to 5 minutes. Again press Start. Microwave will start and will run for 5 minutes. Take out the bowl. Stir Groundnuts. Again place the bowl in the Microwave and set the timer for 3 minutes. About 500 Gms Groundnuts will be properly roasted in about 8 minutes.
==================================================================================
मायक्रोवेव्ह कूकिंग भाग १
मायक्रोवेव्ह हे एक उपयोगी उपकरण आहे. आज काही सोप्या गोष्टी मायक्रोवेव्ह मध्ये कशा करायच्या ते बघूया.
प्रत्येक मायक्रोवेव्हच्या मॉडेलच्या ऑपरेटिंग स्टेप्स वेगवेगळ्या असतात. ह्या पोस्टमध्ये मी माझ्या LG intellowave मायक्रोवेव्हच्या ऑपरेटिंग स्टेप्स दिलेल्या आहेत. त्यामुळे तुम्हाला मायक्रोवेव्हच्या कामाची एक कल्पना येईल. तुमच्या मॉडेल मध्ये जसं सेटिंग असेल तसं तुम्हाला वापरावं लागेल. त्यासाठी मायक्रोवेव्हसोबत आलेली सूचना पुस्तिका (instruction manual) वाचणं गरजेचं आहे. बाकीच्या मॉडेल संदर्भात मी माहिती देऊ शकणार नाही.
मायक्रोवेव्ह वापरताना एक महत्त्वाचा मुद्दा म्हणजे नवीन पदार्थ करताना टायमर कमी लावा. एकदा अंदाज आला की बरोबर टायमर लावता येईल. मायक्रोवेव्ह च्या capacity आणि पदार्थाच्या प्रमाणानुसार पदार्थ शिजवण्यासाठी लागणारा वेळ वेगवेगळा असतो.
मी मायक्रोवेव्ह सोबत आलेली प्लास्टिक ची भांडी आणि काचेची मायक्रोवेव्ह सेफ भांडी वापरते. तुम्हाला प्लास्टिक वापरायचं नसेल तर वापरू नका.
१. पाणी गरम करणे
सध्या कोरोनाच्या काळात बरेच जण सतत गरम / कोमट पाणी पीत असतात. मायक्रोवेव्ह मध्ये चटकन पाणी गरम करता येतं. नेहमीच काचेचा चहाचा कप वापरू शकता. फक्त त्या कपावर सोनेरी नक्षी / कडा नसावी. कपात पाणी घेऊन मायक्रोवेव्ह “quick start” करा. मायक्रोवेव्ह high power वर ३० सेकंद / १ मिनिट (मायक्रोवेव्ह च्या make प्रमाणे सेटिंग वेगवेगळं असतं) चालू होईल. मायक्रोवेव्ह मोड मध्ये डिस्पले वर तीन लाटांचं चिन्ह दिसतं. ३० सेकंदात कपभर पाणी छान गरम होतं. कमी गरम हवं असेल तर मायक्रोवेव्ह मधेच थांबवा. मायक्रोवेव्ह चं दार उघडलं की मायक्रोवेव्ह थांबतो. जास्त गरम हवं असेल तर परत एकदा मायक्रोवेव्ह चालू करा. “quick start” बटन जितके वेळा दाबाल तेवढा टायमर वाढतो (एकदा quick start करून ३० सेकंद येत असेल तर दोनदा दाबून ६० सेकंद येतो). एक दोन वेळा वापरून तुम्हाला सहज अंदाज येईल पाणी गरम करायला किती वेळ लागतो ते. त्याप्रमाणे तुम्हाला टायमर लावता येईल. हे जमलं की गरम पाणी पिण्यासाठी परत परत गॅस पेटवायला नको.
२. पदार्थ डीफ्रॉस्ट (defrost) करणं
बरेचदा फ्रिजमध्ये ठेवलेले पदार्थ आपण आधी काढून ठेवायला विसरतो (पावाला लावायचं बटर तर नेहमीच विसरतो) . अशा वेळी मायक्रोवेव्ह defrost मोड मध्ये चालू करून आपलं काम चटकन होतं. एक महत्त्वाचा मुद्दा लक्षात ठेवायचा म्हणजे पदार्थ ठेवलेलं भांडं मायक्रोवेव्ह मध्ये वापरता येईल असं असावं. बटर ठेवायचा डबा प्लास्टिक चा असेल तर तो मायक्रोवेव्ह मध्ये ठेवून defrost बटन दाबा. साधारण २ – २. १५ मिनिटं टायमर येईल. defrost मोड मध्ये डिस्प्ले वर २ stars दिसतात. बटर १०–१५ सेकंदात defrost होतं. तेव्हा मायक्रोवेव्ह बंद करा. जास्त वेळ ठेवलं तर बटर वितळेल. पदार्थाच्या प्रमाणानुसार defrost चा वेळ बदलेल.
तुमच्या मायक्रोवेव्ह मध्ये defrost बटन नसेल तर पदार्थ defrost करण्यासाठी मायक्रोवेव्ह मोड चालू करा. किती जास्त पदार्थ आहे त्यावर किती वेळ लागेल ते ठरेल. पावाला लावायचं बटर ५ – १० सेकंदात डीफ्रॉस्ट होतं. कोणताही पदार्थ defrost करताना आधी १० सेकंदानी मायक्रोवेव्ह उघडून बघा. नंतर हवे असल्यास आणखी थोडा वेळ मायक्रोवेव्ह चालू करा. मी आधी सांगितल्याप्रमाणे नवीन काही करताना टायमर कमी लावा. एकदा अंदाज आला की बरोबर टायमर लावता येईल.
३. बटाटे शिजवणं
मायक्रोवेव्ह मध्ये वेगवेगळ्या प्रकारे बटाटे शिजवू शकता. ह्या कृतीचे मी फोटो दिले आहेत.
अ. बटाटे धुवून मायक्रोवेव्ह च्या भांड्यात ठेवा. बटाटे अर्धे बुडतील एवढं पाणी घाला. भांडं मायक्रोवेव्ह मध्ये ठेवा. मायक्रोवेव्ह चं दार बंद करा. “quick start” चं बटन ८ वेळा दाबून टायमर ४ मिनिटं लावा (तुमच्या मायक्रोवेव्ह मध्ये “quick start” चं सेटिंग १ मिनिट असेल तर बटन ४ वेळा दाबा). “quick start” मोड मध्ये मायक्रोवेव्ह लगेच चालू होतो. दुसरं काही बटन दाबावं लागत नाही. ४ मिनिटात मध्यम आकाराचे ५–६ बटाटे व्यवस्थित शिजतात. बटाटे लहान / मोठे असतील तर वेळ कमी / जास्त लागेल.
ब. बटाटे धुवून एका प्लास्टिकच्या पिशवीत ठेवा. पिशवीवर काही छापलेलं नसावं. पिशवीची सैलसर घडी घाला आणि मायक्रोवेव्ह मध्ये ठेवून दार बंद करा. बाकी कृती वर दिल्याप्रमाणे. फक्त बटाटे शिजल्यावर पिशवी काढताना काळजीपूर्वक काढा. पिशवीत गरम वाफ असते ती हातावर येऊ शकते.
मायक्रोवेव्हच्या भांड्यापेक्षा प्लास्टिकच्या पिशवीत बटाटे जास्त चांगले शिजले जातात असा माझा अनुभव आहे. अर्थात प्रेशर कुकर मध्ये गॅसवर सगळ्यात बेस्ट शिजतात.
४. शेंगदाणे भाजणे
हे कंटाळवाणं काम मायक्रोवेव्ह मध्ये अगदी सोपं होतं. ह्यासाठी काचेचं मायक्रोवेव्ह चं भांडं घ्या. मी सोबत फोटो दिलाय ते बोरोसिलचं मायक्रोवेव्हचं भांडं आहे. भांड्यात साधारण अर्धा किलो शेंगदाणे घ्या. मायक्रोवेव्ह मध्ये ठेवून दार बंद करा. आता मायक्रोवेव्ह ची पॉवर कशी सेट करायची ते पाहूया. मायक्रोवेव्ह मोड चं बटन फिरवून पॉवर मॅक्सिमम करा (९००). start बटन दाबा. आता टायमर लावायचा आहे. टायमर बटन फिरवून ५ मिनिटं टायमर लावा. स्टार्ट बटन दाबून मायक्रोवेव्ह चालू करा. ५ मिनिटानंतर मायक्रोवेव्ह थांबला की दार उघडून भांडं बाहेर काढा. शेंगदाणे ढवळून पुन्हा ३ मिनिटं टायमर लावा. शेंगदाणे छान खरपूस भाजले जातात.
Your comments / feedback will help improve the recipes